
There’s nothing quite like the smell of a homemade roasted chicken cooking in the oven. With its golden-brown skin, tender, juicy meat, and deliciously seasoned vegetables, this garlic herb butter roasted chicken is the kind of comforting meal that brings everyone to the dinner table.
Whether you’re making Sunday dinner, preparing a special family meal, or simply looking for an easy way to roast a whole chicken, this recipe is a delicious choice.

Why You’ll Love This Garlic Herb Butter Roasted Chicken
Tender, juicy chicken: Spreading seasoned butter underneath the skin helps add richness and flavor directly to the chicken while it roasts.
Beautifully seasoned skin: A combination of garlic powder, onion powder, paprika, herbs, and other seasonings creates a flavorful coating that turns beautifully golden as the chicken cooks.
Even cooking with the spatchcock method: Removing the backbone and flattening the chicken allows the breast and thigh portions to cook more evenly than they would in a traditional whole roasted chicken.
Chicken and vegetables in one dish: Potatoes, carrots, onions, celery, and bell peppers roast underneath the chicken, absorbing some of the delicious seasoned juices.
Packed with garlic and herbs: Fresh rosemary, thyme, garlic, and a flavorful seasoning blend give this dish a wonderful homemade taste.
Perfect for Sunday dinner: This is the kind of hearty, comforting meal that’s ideal for gathering around the table with family.
Great for leftovers: Any leftover chicken can be used for sandwiches, salads, soups, casseroles, or other easy meals throughout the week.
Easy to customize: You can change the vegetables, adjust the seasonings, or use a smaller chicken depending on your family’s needs.
Watch How I make This Recipe
Watch how I make this recipe in the step-by-step video above.
Ingredients You’ll Need
This recipe uses a whole chicken, fresh vegetables, butter, and a flavorful combination of herbs and seasonings.
For the Chicken and Vegetables
- 1 whole chicken (approximately 5 1/2 pounds): Spatchcocked so it cooks more evenly. Choose a fresh or completely thawed chicken.
- 1/2 white onion, chopped: Adds savory flavor to the vegetables and pan juices.
- 2 celery ribs, chopped: Contribute a mild, aromatic flavor as they roast.
- 1/2 green bell pepper, chopped: Adds another layer of flavor to the vegetable mixture.
- 5 garlic cloves: Provide a delicious garlic flavor as they roast with the chicken and vegetables.
- 2 or more potatoes, chopped: Roast underneath the chicken and absorb the seasoned cooking juices. Russet or Yukon Gold potatoes are good options.
- 3 carrots, chopped: Add natural sweetness and color to the vegetable mixture.
- 2 fresh thyme sprigs: Add a mild, earthy herbal flavor.
- 2 fresh rosemary sprigs: Give the roasted chicken a fragrant, savory aroma.
- 1 cup low-sodium chicken broth: Adds moisture and flavor to the bottom of the roasting dish.
For the Garlic Herb Butter Seasoning
- 8 tablespoons unsalted butter (1 stick), softened: Creates a rich, flavorful herb butter that can be spread underneath and over the chicken skin.
- 1 tablespoon plus 1/2 teaspoon Mrs. Dash Garlic & Herb Salt-Free Seasoning: Adds a blend of herbs, garlic, and other savory flavors without additional salt.
- 3 1/2 teaspoons chicken bouillon powder: Adds concentrated chicken flavor to the seasoning mixture.
- 2 teaspoons garlic powder: Enhances the savory garlic flavor.
- 2 teaspoons onion powder: Adds a rich, well-rounded onion flavor.
- 2 teaspoons paprika: Gives the chicken beautiful color and a mild pepper flavor.
- 2 teaspoons salt: Seasons the chicken and helps bring out its natural flavor.
- 1 teaspoon dried parsley: Adds a mild herbal flavor.
- 1 teaspoon black pepper: Provides a little warmth and balances the other seasonings.
How to Make Garlic Herb Butter Roasted Chicken
This recipe comes together in a few simple stages: preparing the vegetables, seasoning the chicken, making the herb butter, and roasting everything until tender and golden.
Step 1: Preheat the Oven and Prepare the Chicken
Preheat your oven to 425°F.
Place the whole chicken on a clean cutting board with the breast side facing down.
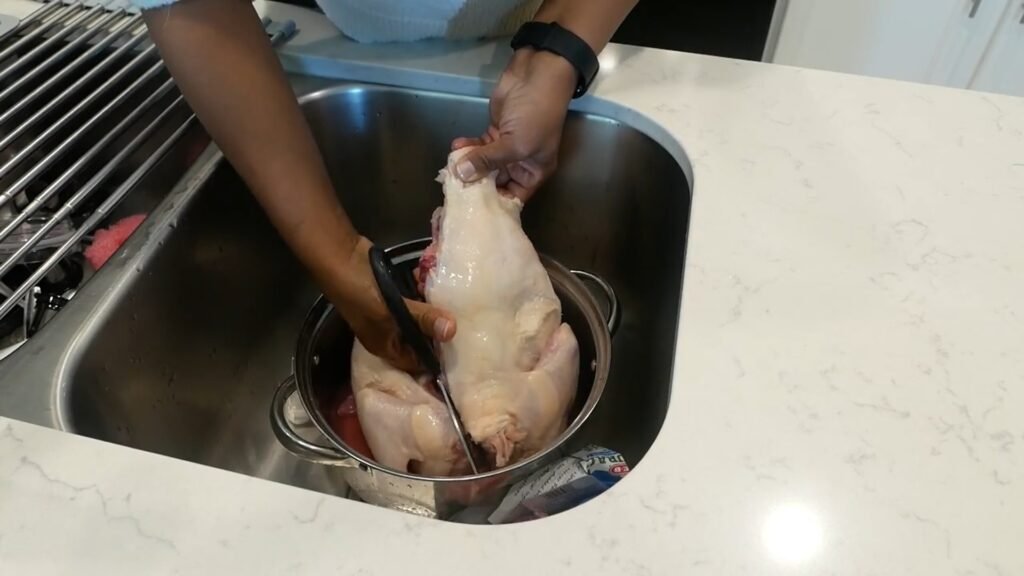
Using sharp kitchen shears, carefully cut along both sides of the backbone and remove it.
Turn the chicken over so the breast side faces up. Press firmly on the breastbone until the chicken flattens.
This technique is called spatchcocking, and it helps the chicken cook more evenly.
Use paper towels to pat the chicken dry, including underneath the wings and around the thighs.
Removing excess moisture helps the skin brown more effectively during roasting.
Set the prepared chicken aside while you arrange the vegetables.
Step 2: Prepare the Vegetables
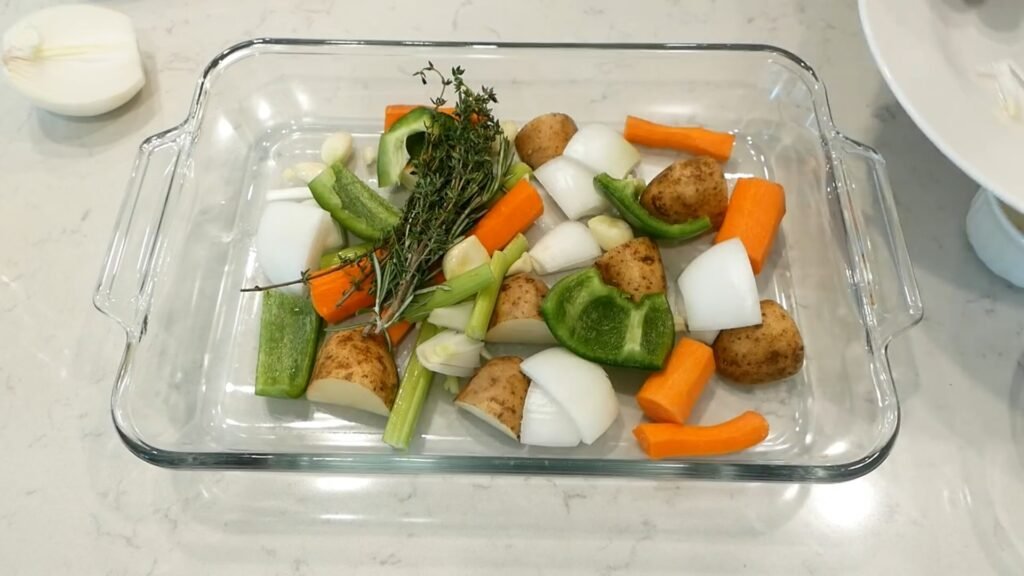
In a 9-by-13-inch casserole dish or a larger roasting pan, add the chopped potatoes, carrots, white onion, celery, green bell pepper, and garlic cloves.
Add the fresh rosemary and thyme sprigs.
Drizzle or brush the vegetables with a little of the softened unsalted butter.
Sprinkle lightly with salt, black pepper, and Mrs. Dash Garlic & Herb Seasoning.
Gently toss the vegetables to distribute the butter and seasonings.
Spread them evenly across the bottom of the dish to create a flavorful bed for the chicken.
Set aside.
Step 3: Prepare the Seasoning Mixture
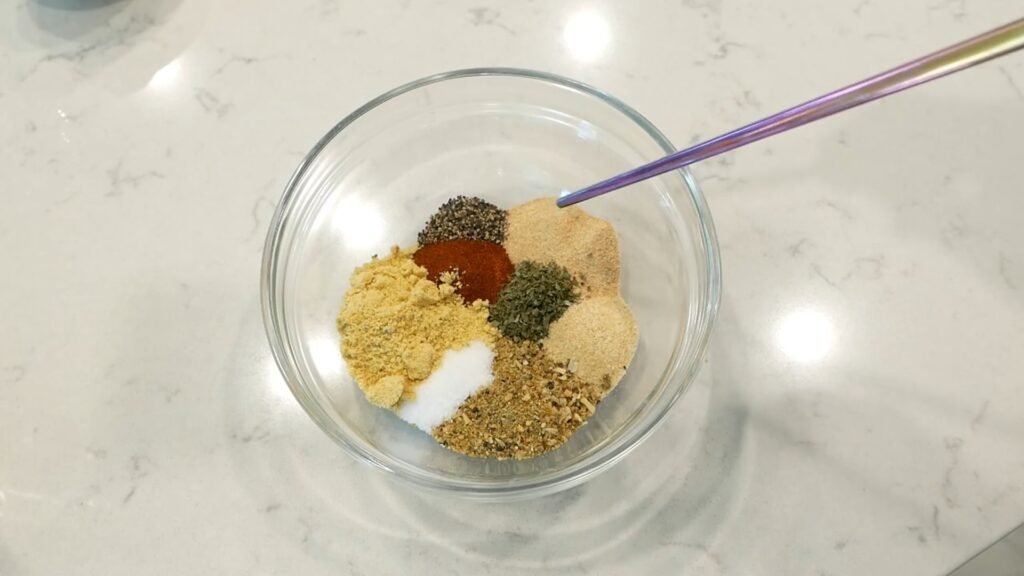
In a small mixing bowl, combine the Mrs. Dash Garlic & Herb Salt-Free Seasoning, chicken bouillon powder, garlic powder, onion powder, paprika, salt, dried parsley, and black pepper.
Stir until all the seasonings are thoroughly combined.
This mixture will be used to season the underside of the chicken and to make the garlic herb butter.
Step 4: Season the Underside of the Chicken
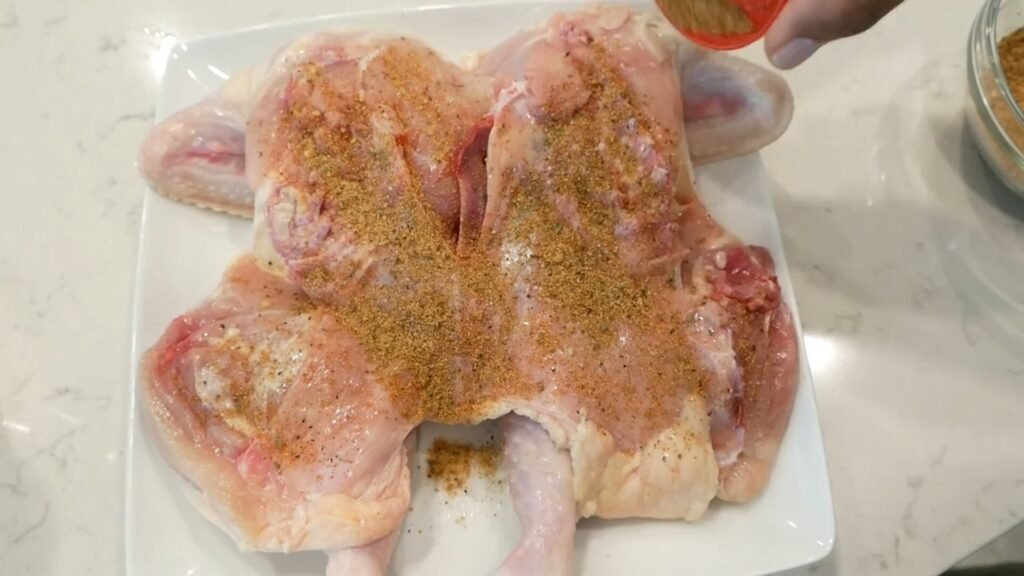
Place the spatchcocked chicken on a clean work surface with the underside facing up.
Sprinkle approximately 1 tablespoon of the prepared seasoning mixture evenly over the underside of the chicken.
Gently rub the seasonings onto the surface to help them adhere.
Turn the chicken over so the breast side faces up.
Step 5: Loosen the Skin
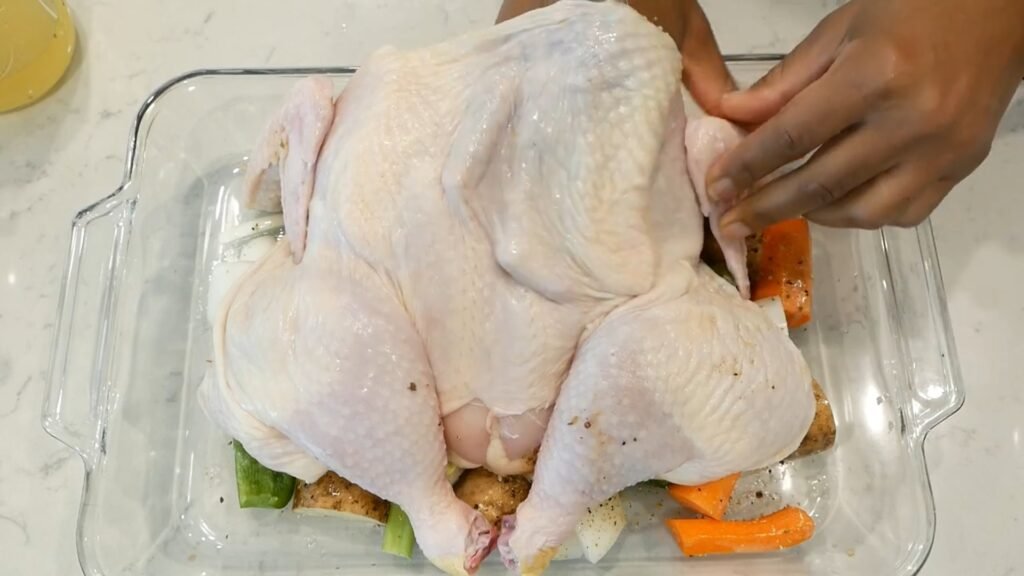
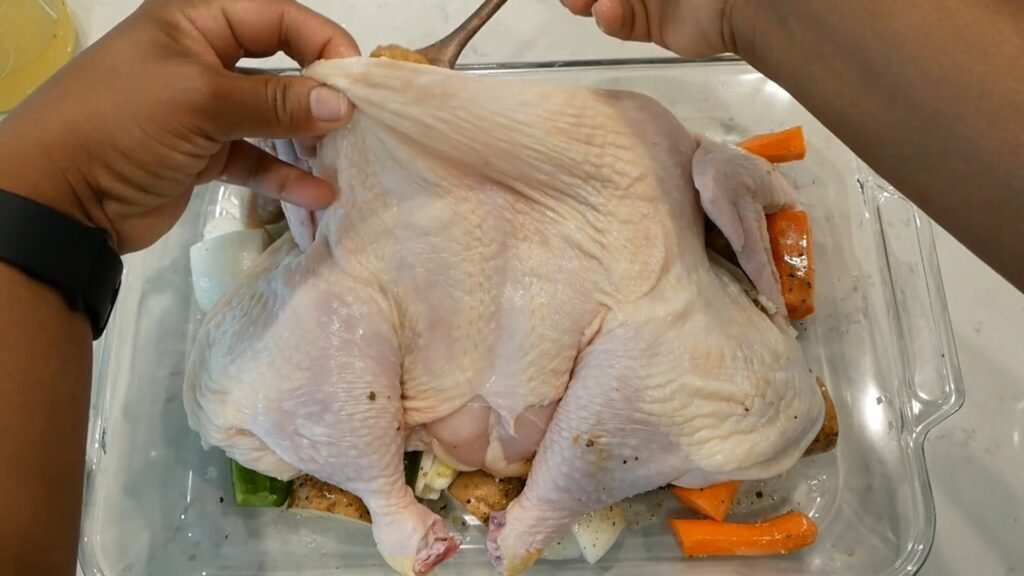
Using clean fingers, carefully slide your hand underneath the skin covering the chicken breasts and thighs.
Gently separate the skin from the meat, being careful not to tear it.
Create enough space to spread the seasoned butter directly onto the meat.
This step is important because it allows the garlic herb butter to flavor the chicken underneath the skin rather than seasoning only the outside.
Step 6: Make the Garlic Herb Butter
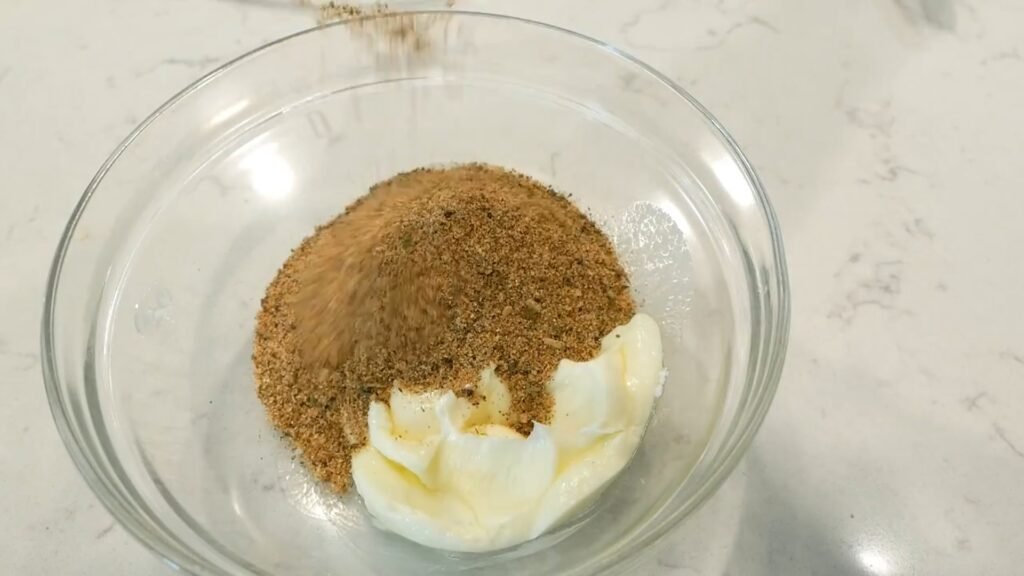
Add the remaining prepared seasoning mixture to the softened unsalted butter.
Using a spoon or spatula, mix until the seasonings are evenly incorporated and the butter forms a smooth, spreadable mixture.
The butter should be soft enough to spread easily but not completely melted.
Step 7: Season the Chicken with Herb Butter
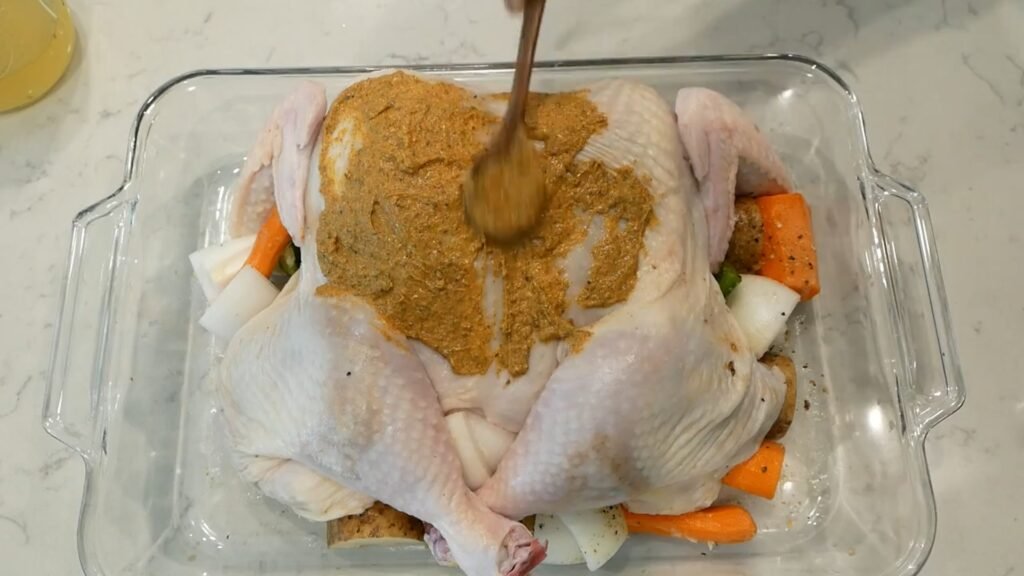
Carefully spread the seasoned butter underneath the loosened skin of the chicken breasts and thighs, working it as evenly as possible over the meat.
Use your fingers to gently distribute the butter underneath the skin.
Rub the remaining seasoned butter over the entire outside surface of the chicken, including the breasts, thighs, legs, and wings.
Make sure the chicken is evenly coated for the best flavor and color.
Step 8: Arrange the Chicken Over the Vegetables
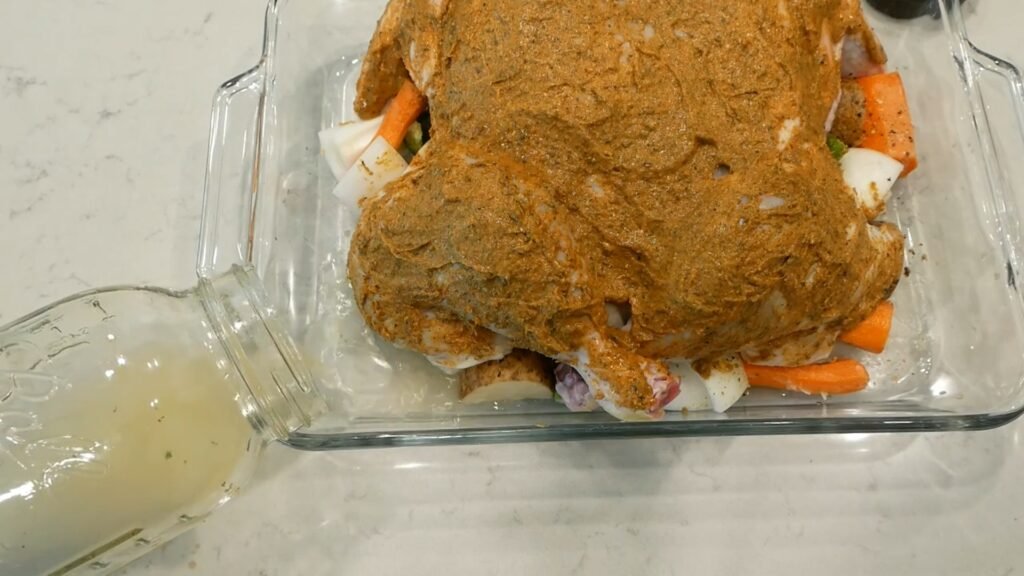
Place the seasoned chicken breast side up on top of the prepared vegetables in the casserole dish.
Arrange the legs and thighs so the chicken lies as flat as possible.
Pour 1 cup of low-sodium chicken broth into the bottom of the dish, around the vegetables rather than directly over the chicken.
This helps provide moisture for the vegetables and creates flavorful pan juices without washing away the seasonings on the chicken skin.
Step 9: Roast the Chicken
Place the uncovered casserole dish in the preheated 425°F oven.
Roast until the chicken is golden brown and the internal temperature reaches at least 165°F in the thickest part of the breast and thigh, without touching bone.
Begin checking the temperature after approximately 60 minutes. A 5 1/2-pound spatchcocked chicken may take around 60–90 minutes, depending on its thickness, the roasting dish, and your oven.
During roasting, baste the chicken with the pan juices every 30–45 minutes, if desired.
If the vegetables begin to look dry, add a small splash of additional chicken broth to the bottom of the dish.
If the chicken skin begins browning too quickly, loosely cover the darkest areas with aluminum foil.
Always use a meat thermometer to determine doneness rather than relying on cooking time alone.
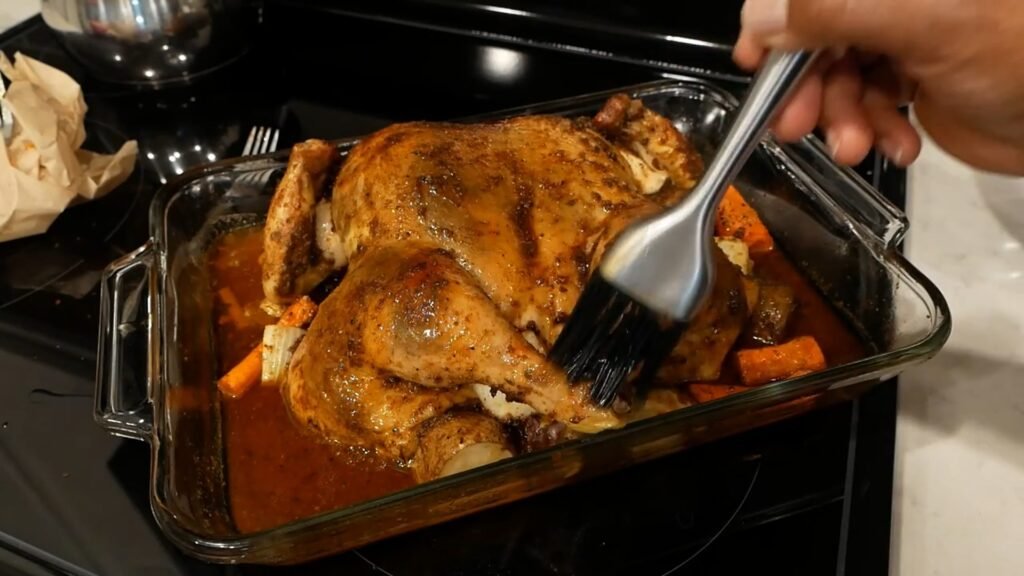
Step 10: Allow the Chicken to Rest
Once the chicken has reached a safe internal temperature, carefully remove the roasting dish from the oven.
Transfer the chicken to a clean cutting board or serving platter.
Allow it to rest for approximately 10–15 minutes before carving.
Resting helps reduce the amount of juice lost when the chicken is cut.
Check the vegetables for tenderness. If they need additional cooking time, return them to the oven while the chicken rests.
Step 11: Carve and Serve
Using a sharp knife, carefully separate the legs, thighs, wings, and breasts into serving portions.
Arrange the chicken on a platter alongside the roasted vegetables.
Spoon a little of the flavorful pan juices over the chicken and vegetables, if desired.
Serve warm and enjoy!
What Is Spatchcock Chicken?
Spatchcocking is a simple preparation technique that involves removing the backbone from a whole chicken and flattening it before cooking.
Although the name may sound complicated, the process is fairly straightforward with a good pair of kitchen shears.
By flattening the chicken, more of its surface is exposed to the oven’s heat.
This helps the chicken cook more evenly and can reduce the cooking time compared with roasting a whole chicken in its traditional shape.
Spatchcocking also makes it easier to spread seasoning and herb butter across the chicken.
The result is a beautifully roasted bird with flavorful skin and tender meat.
Why Use Herb Butter Under the Chicken Skin?
One of my favorite techniques for preparing roasted chicken is spreading seasoned butter underneath the skin.
While rubbing seasonings on the outside gives the skin delicious flavor, placing seasoned butter underneath allows the butter and spices to come into direct contact with the meat.
As the chicken roasts, the butter melts and spreads across the surface of the meat, adding richness and flavor.
The garlic powder, onion powder, paprika, herbs, and other seasonings help create a delicious savory coating.
Using butter both underneath and on top of the skin gives the chicken plenty of flavor throughout the roasting process.
It’s a simple step that makes this homemade roasted chicken especially delicious.
Helpful Tips for the Best Roasted Chicken
Pat the chicken completely dry. Excess surface moisture can interfere with browning. Use paper towels to dry the chicken thoroughly before adding the seasonings.
Use softened butter. Room-temperature butter is much easier to spread underneath the skin than cold butter. It should be soft and spreadable, not melted.
Loosen the skin carefully. Work slowly when separating the skin from the breasts and thighs. Avoid tearing it so the butter stays underneath during roasting.
Season underneath and on top. Seasoning the underside, adding herb butter beneath the skin, and coating the outside creates several layers of flavor.
Cut vegetables into similar-sized pieces. Evenly sized vegetables cook more consistently. Cut firm vegetables such as potatoes and carrots into pieces that will become tender during the chicken’s roasting time.
Use a large enough roasting dish. The chicken should lie comfortably over the vegetables without being tightly crowded. A larger roasting pan may allow better airflow and browning.
Add the broth around the chicken. Pour the low-sodium chicken broth into the bottom of the dish rather than over the skin to avoid washing away the seasonings.
Don’t rely on time alone. The thickness of the chicken, oven temperature, and type of roasting dish can affect cooking time. A reliable meat thermometer is the best way to check for doneness.
Baste sparingly. Basting adds pan juices to the surface, but opening the oven frequently can slow cooking. One or two bastings during roasting are usually enough.
Let the chicken rest before carving. Resting for 10–15 minutes helps the meat retain more of its juices when sliced.
How Much Salt Should You Use When Roasting a Whole Chicken?
The amount of salt needed depends on the weight of the chicken, the type of salt being used, and whether other seasonings contain sodium.
A larger chicken generally requires more seasoning than a smaller one, but salt should not be increased automatically by a fixed teaspoon-per-pound formula.
Different types of salt can contain significantly different amounts of sodium by volume.
For example, a teaspoon of fine table salt contains more salt by weight than a teaspoon of some coarse kosher salts.
It’s also important to consider ingredients such as chicken bouillon powder and chicken broth, which may already contain a considerable amount of sodium.
For this recipe, I use 2 teaspoons of salt in the seasoning mixture, along with chicken bouillon and the other seasonings.
If you’re using a smaller or larger chicken, adjust the overall seasoning quantities as needed, taking the sodium content of your ingredients into consideration.
For the most consistent results, use the same type of salt and bouillon each time you prepare the recipe.
Why Roast Chicken on a Bed of Vegetables?
Roasting chicken over vegetables is a convenient way to prepare a complete meal while adding flavor to the pan.
As the chicken cooks, its seasoned juices and melted herb butter drip onto the vegetables below.
Potatoes and carrots absorb some of these juices, while onions, celery, bell peppers, garlic, rosemary, and thyme contribute their own flavors.
The vegetables also help elevate portions of the chicken above the bottom of the roasting dish.
Adding chicken broth provides moisture to the vegetables and creates a flavorful liquid that can be spooned over the finished meal.
The result is a delicious combination of roasted chicken and vegetables with very little additional preparation.
Easy Variations and Substitutions
This recipe is delicious as written, but there are several ways to customize it.
Try Different Potatoes
Russet potatoes, Yukon Gold potatoes, or red potatoes can all work well.
Yukon Gold potatoes are especially delicious because of their naturally creamy texture.
Add More Vegetables
Parsnips, sweet potatoes, or additional carrots can be added to the roasting dish.
Just be mindful of overcrowding, as too many vegetables can prevent even roasting.
Use Fresh Parsley
If you have fresh parsley available, sprinkle a little over the finished chicken for extra color and a fresh herbal flavor.
Add Lemon
For a brighter flavor, serve the roasted chicken with fresh lemon wedges.
A little lemon juice squeezed over the finished chicken can complement the garlic and herbs beautifully.
Make a Simple Pan Gravy
The flavorful liquid left in the roasting dish can be used as the base for a homemade gravy.
Strain the pan juices, remove excess fat if desired, and thicken with a flour or cornstarch slurry.
Taste before adding additional salt because the juices will already contain seasoning and chicken bouillon.
What to Serve with Garlic Herb Butter Roasted Chicken
Although this recipe includes potatoes and vegetables, you can easily turn it into a larger family meal with a few additional side dishes.
Southern Collard Greens with Smoked Turkey: A flavorful Southern side dish that pairs beautifully with roasted chicken.
Homemade Mashed Potatoes: Creamy mashed potatoes are perfect for soaking up the delicious pan juices.
Southern Green Beans: A classic vegetable side dish that complements the savory garlic and herb flavors.
Homemade Dinner Rolls: Soft, warm rolls are wonderful for enjoying every last bit of the flavorful juices.
Southern Cornbread: A delicious addition to a comforting Sunday dinner.
You can also keep things simple and serve the chicken with the vegetables roasted right in the pan.
Frequently Asked Questions
Should I cover the chicken while roasting?
No. This recipe is designed to roast uncovered so the skin can develop a golden-brown color.
If certain areas begin browning too quickly, loosely cover those areas with aluminum foil.
Do I need to baste the chicken?
Basting is optional, but I like to spoon some of the flavorful pan juices over the chicken during roasting.
If you choose to baste, doing so every 30–45 minutes is sufficient.
Keep in mind that frequent basting can soften the skin and reduce crispness.
How do I know when the chicken is fully cooked?
Use an instant-read meat thermometer.
Insert it into the thickest part of the breast and thigh without touching bone.
The chicken should reach at least 165°F.
Why isn’t my chicken skin crispy?
Several things can affect how crispy the skin becomes.
Excess moisture, overcrowding, too much liquid touching the skin, and frequent basting can all prevent the skin from becoming crisp.
For better browning, pat the chicken dry before seasoning and use a roasting dish large enough to allow some airflow around the chicken.
How to Store and Reheat Leftover Roasted Chicken
Refrigerator Storage
Allow the chicken to cool slightly, then transfer leftovers to shallow, airtight containers.
Refrigerate within 2 hours of cooking.
Properly stored cooked chicken can be kept in the refrigerator for 3–4 days.
Store the roasted vegetables separately or alongside the chicken.
Freezer Storage
Remove the leftover chicken from the bones and place the meat in freezer-safe containers or bags.
Freeze for up to 3 months for the best quality.
Label the containers with the date so you can keep track of storage time.
Reheating in the Oven
Preheat the oven to 325°F.
Place the chicken in an oven-safe dish and add a small splash of chicken broth to help prevent it from drying out.
Cover loosely with aluminum foil and heat until the chicken reaches an internal temperature of 165°F.
Reheating in the Microwave
Place an individual portion of chicken on a microwave-safe plate.
Cover and reheat in short intervals until thoroughly heated to 165°F.
Avoid overheating, which can cause the meat to become dry.
Garlic Herb Butter Roasted Chicken (Spatchcock Chicken)
Ingredients
Method
- Preheat the oven: Preheat your oven to 425°F.
- Spatchcock the chicken: Place the chicken breast side down on a cutting board. Using kitchen shears, cut along both sides of the backbone and remove it. Turn the chicken breast side up and press firmly on the breastbone to flatten. Pat the chicken thoroughly dry with paper towels.
- Prepare the vegetables: Add the chopped onion, celery, bell pepper, garlic, potatoes, carrots, rosemary, and thyme to a 9-by-13-inch casserole dish or larger roasting pan. Brush with a little softened butter and lightly season with salt, black pepper, and Mrs. Dash Garlic & Herb Seasoning. Spread evenly across the bottom of the dish.
- Combine the seasonings: In a small bowl, mix together the Mrs. Dash Garlic & Herb Seasoning, chicken bouillon powder, garlic powder, onion powder, paprika, salt, dried parsley, and black pepper.
- Season the underside: Sprinkle approximately 1 tablespoon of the seasoning mixture evenly over the underside of the chicken. Rub gently to distribute. Turn the chicken breast side up.
- Loosen the skin: Carefully slide your fingers underneath the skin covering the breasts and thighs, gently separating it from the meat without tearing.
- Make the herb butter: Add the remaining seasoning mixture to the softened unsalted butter. Mix until thoroughly combined and spreadable.
- Season the chicken: Spread the seasoned butter evenly underneath the skin of the breasts and thighs. Rub the remaining butter over the entire outside surface of the chicken, including the legs and wings.
- Arrange in the pan: Place the chicken breast side up over the prepared vegetables. Pour 1 cup of low-sodium chicken broth into the bottom of the dish around the vegetables.
- Roast: Bake uncovered at 425°F until the chicken is golden brown and the thickest parts of the breast and thigh reach an internal temperature of at least 165°F. Begin checking around 60 minutes; total roasting time may be approximately 60–90 minutes. Baste with pan juices every 30–45 minutes if desired.
- Rest: Remove the chicken from the oven and allow it to rest for 10–15 minutes before carving. If the vegetables need more time, return them to the oven until tender.
- Serve: Carve the chicken and serve with the roasted vegetables and flavorful pan juices. Enjoy!
Video
Notes
- Chicken size: This recipe uses a 5 1/2-pound whole chicken. Adjust the seasonings and roasting time as needed for smaller or larger chickens.
- Salt: The recipe contains added salt and chicken bouillon. Salt needs may vary depending on chicken size, the type of salt, and the sodium content of the bouillon and broth.
- Butter: Use softened unsalted butter for easier spreading underneath the skin.
- Vegetables: Cut potatoes and carrots into similar-sized pieces to help them cook evenly.
- Pan size: Use a roasting dish large enough to hold the flattened chicken comfortably without overcrowding.
- Broth: Pour the chicken broth around the vegetables rather than over the chicken skin.
- Basting: Baste every 30–45 minutes if desired, but avoid excessive basting if you prefer crispier skin.
- Temperature: The chicken must reach at least 165°F in the thickest parts of the breast and thigh.
- Resting: Allow the chicken to rest for 10–15 minutes before carving.
- Storage: Refrigerate leftovers in airtight containers for 3–4 days.
More Recipes to Try
If you enjoyed this recipe, here are a few more you might love:


Did you make this garlic herb butter roasted chicken? Leave a star rating below and let me know how it turned out!